

Before all, the code used in this post can be found at:
What is NestJS? If you already know it you can skip this part. NestJS is a framework for building Node.JS applications. It gives you lots of advantages and tools for making them scalable and performant. One of the best parts is that NestJS has the tools needed for building microservices. You can achieve full transport independence, define messaging patterns as well as other things to make our life easier when developing microservices.
If you're completely new to NestJS I recommend you to read the overview and the authentication technique. And, since we are going to develop a couple of microservices, it's a good idea to read also the microservices part. I know that the read could take you some minutes, but it's worth it. I'll wait here!
I'm going to assume in this post that you already read that, so I can skip some configuration and code that is already present there (and probably better explained 😝).
In this post I'm going to use TypeScript and NPM. But just for the records, NestJS allows any combination of typescript or javascript with npm or yarn.
The NestJS documentation shows how to build an application with the authentication and user management in the same place. What I want to show you is how to build that same thing, but for microservices.
That will involve splitting the auth part from the user management part. And also you should be able to request the auth microservice authentication or authorization for a specific user and from any microservice in your network.
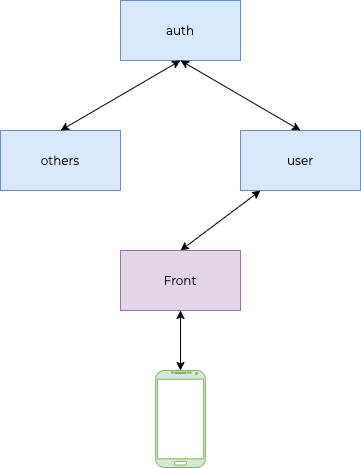
The image shows a simplified architecture without gateways or other things. As you can see, other microservices could be connected to the auth one the same way the user does.
Let's start building our architecture...
Messaging between microservices
NestJS provides us the tools needed to communicate between the microservices using message patterns. Why are message patterns so useful?
Imagine we define a message like { role: 'user', cmd: 'check' } to be handled by a specific function. And now, imagine that in the future we want to upgrade or extend the functionality of that feature. We can add a new { role: 'user', cmd: 'check', type: 'newfeature' } message and the network will automatically redirect the new message to a new function which, inside, can end by sending a { role: 'user', cmd: 'check' } message.
With that approach we can extend our architecture with new features without modifying, stopping or deleting old microservices, just adding new ones.
Defining our messages
So let's elaborate the list of messages and request we are going to use in our architecture. First, what do we want to achieve?
- Authenticate a user in the auth service
- Retrieve a user by user id from the user service
- Authorize logged in users (and check if their login is valid)
- Protect a route and make it only available to authorized users
For the first requirement we don't really need a message, because that's going to be done with a POST request. And the request will be:
POST /auth Body: { username: string, password: string }
For the second requirement we need a message. For retrieving a user we are going to use:
// Pattern:
{ role: 'user', cmd: 'get' }

// Payload:
{ username: string }
And, for checking if a user is authenticated or not:
// Pattern:
{ role: 'auth', cmd: 'check' }

// Payload:
{ jwt: string }
For the last requirement, we are going to define the following route:
GET /greet
That will only be accessible by authenticated users.
Those messages give us a natural split in two different microservices, the auth and the users one. So let's build them!
Auth microservice
First of all we are going to generate our authentication microservice using nest-cli. If you don't have nest-cli installed, install it with:
npm install -g @nestjs/cli
Once the cli is installed, we can generate our microservice with the command:
nest new auth
That command will generate a new empty NestJS project. Now let's install our dependencies.
Auth service dependencies
For this post, we are going to use TCP as transporter and, as shown in the authentication guide, passport. Also we have to install the nest/microservices package. So let's do that them:
cd auth
npm i -S @nestjs/microservices @nestjs/passport @nestjs/jwt passport passport-local passport-jwt bcrypt
npm i --D @types/passport-local @types/passport-jwt @types/bcrypt
Auth service development
With everything installed we can start developing the microservice. The first thing is, as you know, change the main.ts file to make it a hybrid application.
async function bootstrap() {
  const app = await NestFactory.create(AppModule);

  app.connectMicroservice({
    transport: Transport.TCP,
    options: {
      host: 'localhost',
      port: 4000
    }
  })

  await app.startAllMicroservicesAsync();
  await app.listen(3000);
  Logger.log('Auth microservice running');
}
bootstrap();
This is a standard bootstrap function. We are using TCP transport for simplicity, but if we want to avoid the need of a service discovery or the anti-pattern of hard-coding other microservices locations (as we are going to do in this post), we should use a message queue (like NATS, Kafka, RabbitMQ...).
Now that we have the main file ready, let's take a look at the AppModule.
@Module({
  imports: [AuthModule],
  controllers: [],
  providers: [],
})
export class AppModule {}
As you can see, we have removed every providers and controllers, because they are going to be inside the AuthModule.
Now we have to define our AuthModule:
@Module({
  providers: [AuthService]
})
export class AuthModule {}
For now we are going to put only our AuthService as a provider, since we haven't implemented anything else yet. As you may know, we have to implement the user validation function. We are going to do that in our AuthService. This is the first point in which we are going to take advantage of the microservices architeture.
@Injectable()
export class AuthService {
  constructor(
    @Inject('USER_CLIENT')
    private readonly client: ClientProxy
    private readonly jwtService: JwtService) {}

  async validateUser(username: string, password: string): Promise<any> {
    try {
      const user = await this.client.send({ role: 'user', cmd: 'get' }, { username })
      .pipe(
        timeout(5000),
        catchError(err => {
        if (err instanceof TimeoutError) {
          return throwError(new RequestTimeoutException());
        }
        return throwError(err);
      }),)
      .toPromise();

      if(compareSync(password, user?.password)) {
        return user;
      }

      return null;
    } catch(e) {
      Logger.log(e);
      throw e;
    }
  }

  async login(user) {
    const payload = { user, sub: user.id};

    return {
      userId: user.id,
      accessToken: this.jwtService.sign(payload)
    };
  }
}
As you can see here, we are introducing new concepts. The login function is the same as in the docs, so no need to explain much, just takes the payload and issues a JWT. We also injected the JwtService the same way the doc does, so let's review validateUser function.
First of all we are sending a message to another microservice. For that we are using the NestJS ClientProxy injectable. That client proxy has to be configured elsewhere (we'll se later), and gives us helper functions to send messages or emit events to other microservices.
The send function is returning an Observable, so we are taking advantage of that and piping it. If the response takes (for whatever reason) more than 5 seconds, we are forcing a timeout error.
If the message is answered correctly, we are going to compare the received user password with the password received in the API request. We use a timing-safe function for comparing the passwords. If it's correct we return the user (successful authentication), otherwise we return null (failed authentication).
But how can we inject and where should we configure the ClientProxy? Of course, in our AuthModule:
@Module({
  imports: [ClientsModule.register([{
    name: 'USER_CLIENT',
    transport: Transport.TCP,
    options: {
      host: 'localhost',
      port: 4010,
    }
  }]), JwtModule.register({
    secret: 'yoursecret',
    signOptions: { expiresIn: '60s' }
  })]],
  providers: [AuthService]
})
export class AuthModule {}
We imported the ClientsModule configured with the same transport as our microservice but pointing the microservice we want to send messages to (maybe yo want to use the ConfigModule for not having to repeat the configurations).
Please take into account that the name we put in the ClientsModule has to be the same we put in the @Inject decorator. We also added the JwtModule as in the documentation.
The next step is to implement our local and jwt strategies. Since this part is exactly the same as the one in the documentation I'm just going to put the code here but I'm not going to go through it.
@Injectable()
export class LocalStrategy extends PassportStrategy(Strategy) {
  constructor(private readonly authService: AuthService) {
    super();
  }

  async validate(username: string, password: string): Promise<any> {
    const user = await this.authService.validateUser(username, password);

    if(!user) {
      throw new UnauthorizedException();
    }

    return user;
  }
}
export class JwtStrategy extends PassportStrategy(Strategy) {
  constructor(configService: ConfigService) {
    super({
      jwtFromRequest: ExtractJwt.fromAuthHeaderAsBearerToken(),
      ignoreExpiration: false,
      secretOrKey: 'yoursecret'
    });
  }

  async validate(payload) {
    return { id: payload.sub, user: payload.user};
  }
}
Now we have to add the strategy as a provider in our module:
@Module({
  imports: [ClientsModule.register([{
    name: 'USER_CLIENT',
    transport: Transport.TCP,
    options: {
      host: 'localhost',
      port: 4010,
    }
  }]), JwtModule.register({
    secret: 'yoursecret',
    signOptions: { expiresIn: '60s' }
  })]],
  providers: [AuthService, LocalStrategy, JwtStrategy]
})
export class AuthModule {}
Now the last part is, as in the docs, create our AuthGuard with the local strategy. No explanation needed here:
@Injectable()
export class LocalAuthGuard extends AuthGuard('local') {}
We are not creating the jwt auth guard, because we are going to implement the authorization in a different way.
The last part is to create our AuthController:
@Controller()
export class AuthController {
  constructor(
    private readonly authService: AuthService) {}

  @UseGuards(LocalAuthGuard)
  @Post('auth')
  async login(@Request() req) {
    return this.authService.login(req.user);
  }
}
This part is the same as the one in the documentation. With this controller, our module will look like this:
@Module({
  imports: [ClientsModule.register([{
    name: 'USER_CLIENT',
    transport: Transport.TCP,
    options: {
      host: 'localhost',
      port: 4010,
    }
  }]), JwtModule.register({
    secret: constants.jwtSecret,
    signOptions: { expiresIn: '60s' }
  })],
  controllers: [AuthController],
  providers: [AuthService, LocalStrategy]
})
export class AuthModule {}
Let's review what we have until this moment. We have our auth microservice set up accepting a POST request to /auth for authenticating a user. That endpoint receives a username and a password and gets the user entity from another microservice not built yet. Based on that response is going to compare the passwords and authenticate or not the user. If you run the microservice with nest start it should start up, but if you try to make a POST request to that service you are going to get a TimeoutError. So...
Let's go into our second microservice!
User microservice
As well as we did with the auth microservice, let's generate the application.
nest new user
User service dependencies
Let's now install the dependencies. Here we don't need passport or strategies, but we do need some data persistence. We are going to use PostgreSQL as persistence layer and TypeORM as orm.
cd user
npm i -S @nestjs/microservices @nestjs/typeorm bcrypt class-validator pg typeorm
npm i -D @types/bcrypt
User service development
The first step is, again, to adapt our bootstrap function to the microservices pattern:
async function bootstrap() {
  const app = await NestFactory.create(AppModule);

  app.connectMicroservice({
    transport: Transport.TCP,
    options: {
      host: 'localhost',
      port: 4010
    }
  });

  app.startAllMicroservicesAsync();
  await app.listen(3010);
}
bootstrap();
Same thing as with the auth service, but with different ports. I like to increase port numbers 10 by 10, but it's just a personal way of doing it.
Now that our service is ready to run as an hybrid application, let's create our UserEntity. That will be the object that is going to represent (thanks to TypeORM) the users in our database:
@Entity()
@Unique(['username'])
@Unique(['email'])
export class User implements UserInterface {
  @PrimaryGeneratedColumn()
  id: number;

  @Column()
  username: string;

  @Column()
  @Min(8)
  password: string;

  @Column()
  name: string;

  @Column()
  @IsEmail()
  email: string;

  @CreateDateColumn()
  createdAt: Date;

  @BeforeInsert()
  async hashPassword() {
    this.password = await hash(this.password, 10);
  }
}
This is a standard entity representing a standard user with username, password, email and name. We added an autogenerated createdAt field and a function that is going to be run before every insertion to hash the password.
You can import thehashfunction from thebcryptpackage.
And the UserInterface is just:
export interface UserInterface {
  id: number
  username: string
  password: string
  name: string
  email: string
}
Now we have to build our AppModule to set up the TypeORM module:
@Module({
  imports: [TypeOrmModule.forRoot({
    type: 'postgres',
    host: 'localhost',
    port: 5432,
    username: 'ms-user',
    password: 'ms-user-pass',
    database: 'ms-user',
    synchronize: true,
    entities: [User]
  })],
})
export class AppModule { }
The entities array contains just one, our UserEntity previously defined.
Tip: For running a PostgreSQL server locally I highly recommend you use their official (docker image)[https://hub.docker.com/_/postgres]
With that in place, let's look at our UsersService. The one responsible of working with the database and user entities:
@Injectable()
export class UserService {
  constructor(
    @InjectRepository(User)
    private readonly userRepository: Repository<User>
  ) {}

  findOne(query: FindConditions<User>): Promise<User> {
    return this.userRepository.findOne(query);
  }

  async createUser(user: any): Promise<InsertResult> {
    try {
      /**
       * Perform all needed checks
       */

      const userEntity = this.userRepository.create(user);

      const res = await this.userRepository.insert(userEntity);

      Logger.log('createUser - Created user');

      return res;
    } catch(e) {
      Logger.log(e);
      throw e;
    }
  }
}
Nothing special there, just functions for inserting and retrieving users. But let's look at the fun part... The UserController.
@Controller()
export class UserController {
  constructor(
    private readonly userService: UserService
  ) { }

  @MessagePattern({ role: 'user', cmd: 'get' })
  getUser(data: any): Promise<User> {
    return this.userService.findOne({ username: data.username });
  }
}
That starts to look familiar. We just implemented our message pattern for the user microservice. This function must not be protected because our auth microservice needs to ask it for the user trying to authenticate. That function will only check in the database if the user exists and, if exists, will send back to the auth microservice.
So our UserModule will look like this:
@Module({
  imports: [
    TypeOrmModule.forFeature([User]),
  ],
  providers: [UserService],
  controllers: [UserController],
})
export class UserModule {}
We have to register again the TypeOrm module for the User feature and, of course, we have to import this module into our root AppModule:
@Module({
  imports: [UserModule, TypeOrmModule.forRoot({
    type: 'postgres',
    host: 'localhost',
    port: 5432,
    username: 'user',
    password: 'pass',
    database: 'user-microservice',
    synchronize: true,
    entities: [User]
  })],
})
export class AppModule { }
Let's summarize again what we have until now!
We built an authentication microservice which accepts a POST request with user and password. That microservice asks via message to our user microservice for the details of that user. Compares the user's password and the received password. If they are different, returns an Unauthorized error. If they are the same, it issues a JWT and returns it to the client. Cool, right??
For testing full flow you first have to insert some users to your Postgres database, for example user1:password. Now run your microservices:
cd auth
npm run start:dev
And
cd user
npm run start:dev
Now our POST request should look like:
curl --location --request POST 'http://localhost:3000/auth' \
--header 'Content-Type: application/json' \
--data-raw '{
	"username": "user1",
	"password": "password"
}'
That request should return you:
{
    "userId": 1,
    "accessToken": "ey..."
}
But if you send an incorrect username or password, you should get an Unauthorized error.
User and auth service together
Ok, you made progress so far, but it seems that there is one more thing missing...
We can now authenticate users, but we also need to authorize them! How can we protect routes in any microservice by using our strategies defined in the auth microservice?
First of all, we need our auth microservice to understand that it needs to handle another type of request, our check message pattern. We are going to implement it in our AuthController:
@Controller()
export class AuthController {
  constructor(
    private readonly authService: AuthService) {}

  @UseGuards(LocalAuthGuard)
  @Post('auth')
  async login(@Request() req) {
    return this.authService.login(req.user);
  }

  @MessagePattern({ role: 'auth', cmd: 'check'})
  async loggedIn(data) {
    try {
      const res = this.authService.validateToken(data.jwt);

      return res;
    } catch(e) {
      Logger.log(e);
      return false;
    }
  }
}
We added the loggedIn function that is going to handle the check message. This function just has to call the one in charge of validating the token. Let's see our AuthService with that function implemented.
@Injectable()
export class AuthService {
  constructor(
    @Inject('USER_CLIENT')
    private readonly client: ClientProxy,
    private readonly jwtService: JwtService) {}

  async validateUser(username: string, password: string): Promise<any> {
    try {
      const user = await this.client.send({ role: 'user', cmd: 'get' }, { username })
      .pipe(
        timeout(5000),
        catchError(err => {
        if (err instanceof TimeoutError) {
          return throwError(new RequestTimeoutException());
        }
        return throwError(err);
      }),)
      .toPromise();

      if(compareSync(password, user?.password)) {
        return user;
      }

      return null;
    } catch(e) {
      Logger.log(e);
      throw e;
    }
  }

  async login(user) {
    const payload = { user, sub: user.id};

    return {
      userId: user.id,
      accessToken: this.jwtService.sign(payload)
    };
  }

  validateToken(jwt: string) {
    return this.jwtService.verify(jwt);
  }
}
The new function just has to take the JWT received and call the JwtService to check whether the token received is valid or not. Simple.
Let's move back again to the user microservice and see how to use that new message pattern to protect routes.
First things firts, let's create a guard for protecting routes. As any guard, it has to have a canActivate function. That is the one in charge of asking to the auth service if the JWT is valid:
export class AuthGuard implements CanActivate {
  constructor(
    @Inject('AUTH_CLIENT')
    private readonly client: ClientProxy
  ) {}

  async canActivate(
    context: ExecutionContext,
  ): Promise<boolean> {
    const req = context.switchToHttp().getRequest();

    try{
      const res = await this.client.send(
        { role: 'auth', cmd: 'check' },
        { jwt: req.headers['authorization']?.split(' ')[1]})
        .pipe(timeout(5000))
        .toPromise<boolean>();

        return res;
    } catch(err) {
      Logger.error(err);
      return false;
    }
  }
}
We are injecting a ClientProxy to be able to send a message to our auth microservice. That client has to be configured (because we are using TCP) to reach the auth microservice. We'll do that in our UserModule.
In the guard we are just getting the request received, extracting the JWT (if present) and sending it to the auth microservice. If we get no response after 5 seconds, we just raise a timeout error. If we do get response, we let the request be processed or not based on that response. Easy!!
Now we just have to create a route and protect it using the @UseGuard decorator, and also register the ClientsModule for making the ClientProxy available in the guard. Let's create, for example, a greet route:
@Controller()
export class UserController {
  constructor(
    private readonly userService: UserService
  ) { }

  @MessagePattern({ role: 'user', cmd: 'get' })
  getUser(data: any): Promise<User> {
    return this.userService.findOne({ username: data.username });
  }

  @UseGuards(AuthGuard)
  @Get('greet')
  async greet(): Promise<string> {
    return 'Greetings authenticated user';
  }
}
The route is going to return a fixed text, but only if you provide a valid JWT.
And, finally, our UserModule has to look like this:
@Module({
  imports: [
    TypeOrmModule.forFeature([User]),
    ClientsModule.register([{
      name: 'AUTH_CLIENT',
      transport: Transport.TCP,
      options: {
        host: 'localhost',
        port: 4000
      }
    }])
  ],
  providers: [UserService],
  controllers: [UserController],
})
export class UserModule {}
Now we can all our login endpoint with valid credentials:
curl --location --request POST 'http://localhost:3000/auth' \
--header 'Content-Type: application/json' \
--data-raw '{
	"username": "user1",
	"password": "password"
}'
To get a valid JWT in the response and, with it, call our brand new /greet route:
curl --location --request GET 'http://localhost:3010/greet' \
--header 'Authorization: Bearer ey...'
And we should receive:
Greetings authenticated user
Instead, if we don't provide a valid JWT:
curl --location --request GET 'http://localhost:3010/greet' \
--header 'Authorization: This isn't valid'
We should receive an error:
{
    "statusCode": 403,
    "message": "Forbidden resource",
    "error": "Forbidden"
}
Conclusions
We have created two different microservices. Each of them is responsible of different sorts of things. The auth microservice is responsible of the authentication and authorization of the users, and the user microservice is responsible of manage them only.
We could add an endpoint for registering new users in the user microservice or add roles based access to the routes in the auth microservice.
The best part of implementing an approach like this is that we can reuse our auth mechanisms in every new microservice we build. But, on the other hand, if we want to work this way we have to be extremely careful and always keep backwards compatibility in our auth microservice.
Disclaimer
This post has the purpose of illustrating how to implement the authentication/authorization in a microservices environment, but also doing it in an easy way for making the post readable and enjoyable.
I added here some simplifications and omitted important parts regarding security. Please, if you plan to move this to production, read some articles about how to add security to microservices and best practices about storing secrets and sensible data in production (like passwords, jwt secrets and so...)
If you liked it, don't forget to leave a comment! :)